Поле для телефона
Чтобы указать телефонный номер используйте для этого специальное поле. По своему виду и работе оно совпадает с текстовым полем. Синтаксис создания этого поля следующий.
<input type="tel" атрибуты>Атрибуты полностью совпадают с текстовым полем.
В отличие от веб-адреса или адреса электронной почты, поле для телефона не проверяется на правильность синтаксиса. Это связано с тем, что телефонные номера в разных местах мира могут иметь самые разнообразные формы написания, включать цифры, буквы и другие символы. Смысл применения этого поля в настройке шаблона ввода телефона, который используется в определённом городе или стране, а также в некоторых расширенных возможностях по управлению стилями.
Создание поля для телефона показано в примере 1. Требуется ввести телефон в указанном формате, иначе браузер выведет сообщение об ошибке и не станет отправлять форму, пока поле не будет заполнено корректно.
Пример 1. Поле для телефона
HTML5IE 10+CrOpSaFx
<!DOCTYPE html>
 <html>
  <head>
  <meta charset="utf-8">
  <title>Телефон</title>
 </head>
 <body>
  <form>
   <p>Ваше имя: <input name="login"></p>
   <p>Телефон в формате 2xxx-xxx:  <input type="tel" name="tel"
   pattern="2[0-9]{3}-[0-9]{3}"></p>
   <p><input type="submit" value="Отправить"></p>
  </form>
 </body>
</html>
Результат примера при вводе неправильного телефона показан на рис. 1.

Рис. 1. Ввод телефона в браузере Chrome
Браузеры IE и Safari не поддерживают этот вид поля и соответственно не делают проверку на шаблон телефона.
HTML по теме
Значение tel
Синтаксис
Описание
Тип tel (от англ. «telephone» ‒ «телефон») создаёт поле ввода телефонного номера.
Внешний вид
Примечание
HTML спецификация не устанавливает определённый синтаксис телефонного номера для данного поля (в отличие от «url» и «email» полей). Это сделано намеренно, так как на практике, поля телефонных номеров, как правило, имеют свободную форму, потому что существует большое разнообразие допустимых телефонных номеров. (Установить необходимый синтаксис телефонного номера можно с помощью атрибута «pattern».)


Поддержка браузерами
Спецификация
Сопутствующие атрибуты
- autocomplete
- Автозаполнение значения поля телефона.
- autofocus
- Автоматческая фокусировка на телефонном поле после полной загрузки страницы.
- disabled
- Блокировка поля телефона.

disabled="disabled" - form
- Присоединение телефонного поле к форме.
- list
- Создание списка рекомендованных вариантов телефонных номеров.
- maxlength
- Задаёт максимально-допустимое количество вводимых символов.
- minlength
- Задаёт минимально-допустимое количество вводимых символов.
- name
- Присваивает имя телефонному полю.
- pattern
- Устанавливает критерий/шаблон ввода.
- placeholder
- Указывает текст-подсказку для пустого поля.
placeholder="Текст-подсказка" - readonly
- Указывает, что поле телефона доступно только для чтения (изменение/редактирование запрещено).
- required
- Указывает, что поле телефона обязательно для заполнения.
- size
- Задаёт ширину телефонного поля по количеству вводимых символов.
size="10" - value
- Указывает значение телефонного поля (отправляется на сервер или используется скриптами).
Примечание: Данный атрибут должен иметь значение, которое не содержит символов «LF» ПЕРЕВОД СТРОКИ [
U+000A] или «CR» ВОЗВРАТ КАРЕТКИ [U+000D]. value="+7 (900) 123-45-67" - Глобальные атрибуты
- accesskey, class, contenteditable, data-*, dir, draggable, dropzone, hidden, id, inert, lang, spellcheck, style, tabindex, title, translate, xml:lang


Пример использования
<!DOCTYPE html>
<html>
<head>
<meta charset=«utf-8»>
<title>Значение tel (input-type)</title>
</head>
<body>
<h1>Пример с полем ввода телефонного номера «type=tel»</h1>
<form action=«/examples/php-scripts/telephone.php» method=«post»>
<fieldset> <legend>Введите ваш номер телефона</legend>
<p><input type=«tel» name=«phone_number» list=«tel-list» placeholder=«+7 (900) 123-45-67» pattern=«+7s?[(]{0,1}9[0-9]{2}[)]{0,1}s?d{3}[-]{0,1}d{2}[-]{0,1}d{2}»></p>
<datalist id=«tel-list»>
<option value=«+7 (900) 123-45-67» label=«Телефонный номер №1»>
<option value=«+7 (900) 123-45-68» label=«Телефонный номер №2»>
</datalist>
</fieldset>
<p><input type=«reset»> <input type=«submit»></p>
</form>
</body>
</html>
Значение tel (input-type)
<input> элемент типа tel используется чтобы разрешить пользователю вводить и редактировать номер телефона. В отличии от<input type="email"> и <input type="url"> , введённое значение не проверяется автоматически по определённом формату, перед тем как форма может быть отправлена , потому что форматы телефонных номеров сильно различаются по всему миру
Интерактивный пример
Despite the fact that inputs of type tel are functionally identical to standard text inputs, they do serve useful purposes; the most quickly apparent of these is that mobile browsers — especially on mobile phones — may opt to present a custom keypad optimized for entering phone numbers. Using a specific input type for telephone numbers also makes adding custom validation and handling of phone numbers more convenient.
Примечание: Browsers that don’t support type tel fall back to being a standard text (en-US) input.
| Value | A DOMString representing a telephone number, or empty |
|---|---|
| Events | change (en-US) and input (en-US) |
| Supported Common Attributes | autocomplete, list, maxlength, minlength, pattern, placeholder, readonly, and size |
| IDL attributes | list, selectionStart, selectionEnd, selectionDirection, and value |
| Methods | select() (en-US), setRangeText() (en-US), setSelectionRange() |
Value
The <input> element’s value attribute contains a DOMString that either represents a telephone number or is an empty string ("").
Additional attributes
In addition to the attributes that operate on all <input> elements regardless of their type, telephone number inputs support the following attributes:
| Attribute | Description |
|---|---|
maxlength |
The maximum length, in UTF-16 characters, to accept as a valid input |
minlength |
The minimum length that is considered valid for the field’s contents |
pattern |
A regular expression the entered value must match to pass constraint validation |
placeholder |
An example value to display inside the field when it has no value |
readonly |
A Boolean attribute which, if present, indicates that the field’s contents should not be user-editable |
size |
The number of characters wide the input field should be onscreen |
maxlength
The maximum number of characters (as UTF-16 code units) the user can enter into the telephone number field. This must be an integer value 0 or higher. If no maxlength is specified, or an invalid value is specified, the telephone number field has no maximum length. This value must also be greater than or equal to the value of minlength.
The input will fail constraint validation (en-US) if the length of the text entered into the field is greater than maxlength UTF-16 code units long.
minlength
The minimum number of characters (as UTF-16 code units) the user can enter into the telephone number field. This must be an non-negative integer value smaller than or equal to the value specified by maxlength. If no minlength is specified, or an invalid value is specified, the telephone number input has no minimum length.
The telephone number field will fail constraint validation (en-US) if the length of the text entered into the field is fewer than minlength UTF-16 code units long.
pattern
{{page(«/en-US/docs/Web/HTML/Element/input/text», «pattern-include»)}}
See Pattern validation below for details and an example.
placeholder
The placeholder attribute is a string that provides a brief hint to the user as to what kind of information is expected in the field. It should be a word or short phrase that demonstrates the expected type of data, rather than an explanatory message. The text must not include carriage returns or line feeds.
If the control’s content has one directionality (LTR or RTL) but needs to present the placeholder in the opposite directionality, you can use Unicode bidirectional algorithm formatting characters to override directionality within the placeholder; see How to use Unicode controls for bidi text for more information.
Note: Avoid using the placeholder attribute if you can. It is not as semantically useful as other ways to explain your form, and can cause unexpected technical issues with your content. See <input> accessibility concerns for more information.
readonly
A Boolean attribute which, if present, means this field cannot be edited by the user. Its value can, however, still be changed by JavaScript code directly setting the HTMLInputElement value property.
Note: Because a read-only field cannot have a value, required does not have any effect on inputs with the readonly attribute also specified.
size
The size attribute is a numeric value indicating how many characters wide the input field should be. The value must be a number greater than zero, and the default value is 20. Since character widths vary, this may or may not be exact and should not be relied upon to be so; the resulting input may be narrower or wider than the specified number of characters, depending on the characters and the font (font settings in use).
This does not set a limit on how many characters the user can enter into the field. It only specifies approximately how many can be seen at a time. To set an upper limit on the length of the input data, use the maxlength attribute.
Non-standard attributes
The following non-standard attributes are available to telephone number input fields. As a general rule, you should avoid using them unless it can’t be helped.
| Attribute | Description |
|---|---|
autocorrect |
Whether or not to allow autocorrect while editing this input field. Safari only. |
mozactionhint |
A string indicating the type of action that will be taken when the user presses the Enter or Return key while editing the field; this is used to determine an appropriate label for that key on a virtual keyboard. Firefox for Android only. |
autocorrect
Non-standard
{{page(«/en-US/docs/Web/HTML/Element/input/text», «autocorrect-include»)}}
mozactionhint
Non-standard
{{page(«/en-US/docs/Web/HTML/Element/input/text», «mozactionhint-include»)}}
Using tel inputs
Telephone numbers are a very commonly collected type of data on the web. When creating any kind of registration or e-commerce site, for example, you will likely need to ask the user for a telephone number, whether for business purposes or for emergency contact purposes. Given how commonly-entered phone numbers are, it’s unfortunate that a «one size fits all» solution for validating phone numbers is not practical.
Fortunately, you can consider the requirements of your own site and implement an appropriate level of validation yourself. See Validation, below, for details.
Custom keyboards
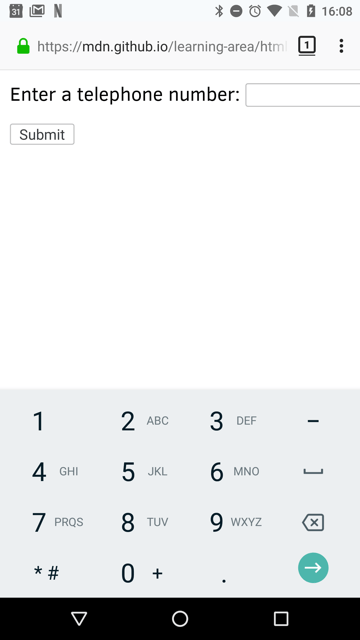
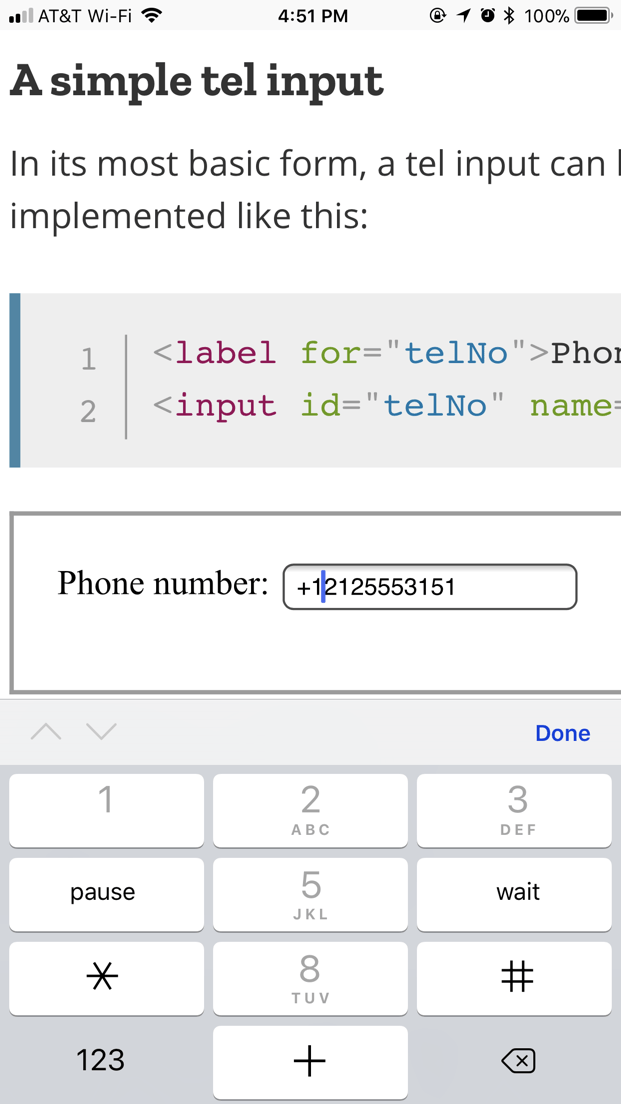
One of the main advantages of <input type="tel"> is that it causes mobile browsers to display a special keyboard for entering phone numbers. For example, here’s what the keypads look like on a couple of devices.
| Firefox for Android | WebKit iOS (Safari/Chrome/Firefox) |
|---|---|
|
|
A simple tel input
In its most basic form, a tel input can be implemented like this:
<label for="telNo">Phone number:</label>
<input id="telNo" name="telNo" type="tel">
There is nothing magical going on here. When submitted to the server, the above input’s data would be represented as, for example, telNo=+12125553151.
Placeholders
Sometimes it’s helpful to offer an in-context hint as to what form the input data should take. This can be especially important if the page design doesn’t offer descriptive labels for each <input>. This is where placeholders come in. A placeholder is a value that demonstrates the form the value should take by presenting an example of a valid value, which is displayed inside the edit box when the element’s value is "". Once data is entered into the box, the placeholder disappears; if the box is emptied, the placeholder reappears.
Here, we have an tel input with the placeholder 123-4567-8901. Note how the placeholder disappears and reappears as you manipulate the contents of the edit field.
<input id="telNo" name="telNo" type="tel"
       placeholder="123-4567-8901">
Controlling the input size
You can control not only the physical length of the input box, but also the minimum and maximum lengths allowed for the input text itself.
Physical input element size
The physical size of the input box can be controlled using the size attribute. With it, you can specify the number of characters the input box can display at a time. In this example, for instance, the tel edit box is 20 characters wide:
<input id="telNo" name="telNo" type="tel"
       size="20">
Element value length
The size is separate from the length limitation on the entered telephone number. You can specify a minimum length, in characters, for the entered telephone number using the minlength attribute; similarly, use maxlength to set the maximum length of the entered telephone number.
The example below creates a 20-character wide telephone number entry box, requiring that the contents be no shorter than 9 characters and no longer than 14 characters.
<input id="telNo" name="telNo" type="tel"
       size="20" minlength="9" maxlength="14">
Примечание: The above attributes do affect Validation — the above example’s inputs will count as invalid if the length of the value is less than 9 characters, or more than 14. Most browser won’t even let you enter a value over the max length.
Providing default options
As always, you can provide a default value for an tel input box by setting its value attribute:
<input id="telNo" name="telNo" type="tel"
       value="333-4444-4444">
Offering suggested values
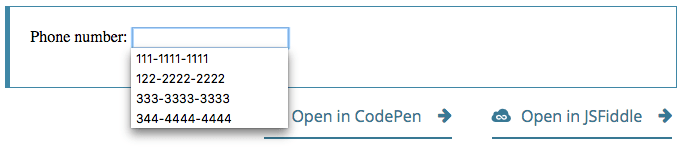
Taking it a step farther, you can provide a list of default phone number values from which the user can select. To do this, use the list attribute. This doesn’t limit the user to those options, but does allow them to select commonly-used telephone numbers more quickly. This also offers hints to autocomplete. The list attribute specifies the ID of a <datalist> element, which in turn contains one <option> element per suggested value; each option‘s value is the corresponding suggested value for the telephone number entry box.
<label for="telNo">Phone number: </label>
<input id="telNo" name="telNo" type="tel" list="defaultTels">

<datalist id="defaultTels">
  <option value="111-1111-1111">
  <option value="122-2222-2222">
  <option value="333-3333-3333">
  <option value="344-4444-4444">
</datalist>
With the <datalist> element and its <option>s in place, the browser will offer the specified values as potential values for the email address; this is typically presented as a popup or drop-down menu containing the suggestions. While the specific user experience may vary from one browser to another, typically clicking in the edit box presents a drop-down of the suggested email addresses. Then, as the user types, the list is adjusted to show only filtered matching values. Each typed character narrows down the list until the user makes a selection or types a custom value.
Here’s a screenshot of what that might look like:
Validation
As we’ve touched on before, it’s quite difficult to provide a one-size-fits-all client-side validation solution for phone numbers. So what can we do? Let’s consider some options.
Предупреждение: Important: HTML form validation is not a substitute for server-side scripts that ensure the entered data is in the proper format before it is allowed into the database. It’s far too easy for someone to make adjustments to the HTML that allow them to bypass the validation, or to remove it entirely. It’s also possible for someone to simply bypass your HTML entirely and submit the data directly to your server. If your server-side code fails to validate the data it receives, disaster could strike when improperly-formatted data (or data which is too large, is of the wrong type, and so forth) is entered into your database.
Making telephone numbers required
You can make it so that an empty input is invalid and won’t be submitted to the server using the required attribute. For example, let’s use this HTML:
<form>
  <div>
    <label for="telNo">Enter a telephone number (required): </label>
    <input id="telNo" name="telNo" type="tel" required>
    <span class="validity"></span>
  </div>
  <div>
    <button>Submit</button>
  </div>
</form>
And let’s include the following CSS to highlight valid entries with a checkmark and invalid entries with a cross:
div {
  margin-bottom: 10px;
  position: relative;
}

input[type="number"] {
  width: 100px;
}

input + span {
  padding-right: 30px;
}

input:invalid+span:after {
  position: absolute; content: '✖';
  padding-left: 5px;
  color: #8b0000;
}

input:valid+span:after {
  position: absolute;
  content: '✓';
  padding-left: 5px;
  color: #009000;
}
The output looks like this:
Pattern validation
If you want to further restrict entered numbers so they also have to conform to a specific pattern, you can use the pattern attribute, which takes as its value a regular expression that entered values have to match.
In this example we’ll use the same CSS as before, but our HTML is changed to look like this:
<form>
  <div>
    <label for="telNo">Enter a telephone number (in the form xxx-xxx-xxxx): </label>
    <input id="telNo" name="telNo" type="tel" required
           pattern="[0-9]{3}-[0-9]{3}-[0-9]{4}">
    <span class="validity"></span>
  </div>
  <div>
    <button>Submit</button>
  </div>
</form>
div {
  margin-bottom: 10px;
  position: relative;
}

input[type="number"] {
  width: 100px;
}

input + span {
  padding-right: 30px;
}

input:invalid+span:after {
  position: absolute; content: '✖';
  padding-left: 5px;
  color: #8b0000;
}

input:valid+span:after {
  position: absolute;
  content: '✓';
  padding-left: 5px;
  color: #009000;
}
Notice how the entered value is reported as invalid unless the pattern xxx-xxx-xxxx is matched; for instance, 41-323-421 won’t be accepted. Neither will 800-MDN-ROCKS. However, 865-555-6502 will be accepted. This particular pattern is obviously only useful for certain locales — in a real application you’d probably have to vary the pattern used depending on the locale of the user.
Examples
In this example, we present a simple interface with a <select> element that lets the user choose which country they’re in, and a set of <input type="tel"> elements to let them enter each part of their phone number; there is no reason why you can’t have multiple tel inputs.
Each input has a placeholder attribute to show a hint to sighted users about what to enter into it, a pattern to enforce a specific number of characters for the desired section, and an aria-label attribute to contain a hint to be read out to screenreader users about what to enter into it.
<form>
  <div>
    <label for="country">Choose your country:</label>
    <select id="country" name="country">
      <option>UK</option>
      <option selected>US</option>
      <option>Germany</option>
    </select>
  </div>
  <div>
    <p>Enter your telephone number: </p>
    <span class="areaDiv">
      <input id="areaNo" name="areaNo" type="tel" required
             placeholder="Area code" pattern="[0-9]{3}"
             aria-label="Area code">
      <span class="validity"></span>
    </span>
    <span class="number1Div">
      <input id="number1" name="number1" type="tel" required
             placeholder="First part" pattern="[0-9]{3}"
             aria-label="First part of number">
      <span class="validity"></span>
    </span>
    <span class="number2Div">
      <input id="number2" name="number2" type="tel" required
             placeholder="Second part" pattern="[0-9]{4}"
             aria-label="Second part of number">
      <span class="validity"></span>
    </span>
  </div>
  <div>
    <button>Submit</button>
  </div>
</form>
The JavaScript is relatively simple — it contains an onchange event handler that, when the <select> value is changed, updates the <input> element’s pattern, placeholder, and aria-label to suit the format of telephone numbers in that country/territory.
var selectElem = document.querySelector("select");
var inputElems = document.querySelectorAll("input");

selectElem.onchange = function() {
  for(var i = 0; i < inputElems.length; i++) {
    inputElems[i].value = "";
  }

  if(selectElem.value === "US") {
    inputElems[2].parentNode.style.display = "inline";

    inputElems[0].placeholder = "Area code";
    inputElems[0].pattern = "[0-9]{3}";

    inputElems[1].placeholder = "First part";
    inputElems[1].pattern = "[0-9]{3}";
    inputElems[1].setAttribute("aria-label","First part of number");

    inputElems[2].placeholder = "Second part";
    inputElems[2].pattern = "[0-9]{4}";
    inputElems[2].setAttribute("aria-label","Second part of number");
  } else if(selectElem.value === "UK") {
    inputElems[2].parentNode.style.display = "none";

    inputElems[0].placeholder = "Area code";
    inputElems[0].pattern = "[0-9]{3,6}";

    inputElems[1].placeholder = "Local number";
    inputElems[1].pattern = "[0-9]{4,8}";
    inputElems[1].setAttribute("aria-label","Local number");
  } else if(selectElem.value === "Germany") {
    inputElems[2].parentNode.style.display = "inline";

    inputElems[0].placeholder = "Area code";
    inputElems[0].pattern = "[0-9]{3,5}";

    inputElems[1].placeholder = "First part";
    inputElems[1].pattern = "[0-9]{2,4}";
    inputElems[1].setAttribute("aria-label","First part of number");

    inputElems[2].placeholder = "Second part";
    inputElems[2].pattern = "[0-9]{4}";
    inputElems[2].setAttribute("aria-label","Second part of number");
  }
}
The example looks like this:
This is an interesting idea, which goes to show a potential solution to the problem of dealing with international phone numbers. You would have to extend the example of course to provide the correct pattern for potentially every country, which would be a lot of work, and there would still be no foolproof guarantee that the users would enter their numbers correctly.
It makes you wonder if it is worth going to all this trouble on the client-side, when you could just let the user enter their number in whatever format they wanted on the client-side and then validate and sanitize it on the server. But this choice is yours to make.
div {
margin-bottom: 10px;
position: relative;
}

input[type="number"] {
  width: 100px;
}

input + span {
  padding-right: 30px;
}

input:invalid+span:after {
  position: absolute; content: '✖';
  padding-left: 5px;
  color: #8b0000;
}

input:valid+span:after {
  position: absolute;
  content: '✓';
  padding-left: 5px;
  color: #009000;
}
Specifications
Browser compatibility
BCD tables only load in the browser
See also
Поле для ввода телефонного номера
Специальное поле, упрощающее ввод телефонного номера.
Когда использовать
Используйте специальное поле для ввода телефона, когда нужен номер в полном формате.
Для ввода номеров телефона без форматирования можно использовать обычное поле ввода.

Описание работы
Поле для ввода телефона — это частный случай поля с маской, с двумя отличиями:
- В начале поля стоит префикс «+7», который подсказывают пользователю, что номер нужно ввести в полном формате. Префикс нельзя стереть.
- При вставке скопированного номера из 11 цифр, первые +7 или 8 вырезаются.

Размер и расположение
Поле ввода телефона, как и обычное поле, может быть трех размеров. Подробнее смотри в гайде поля ввода.
Рекомендуемая ширина поля — 160 px.
Фокус и работа с клавиатурой
При клике по полю и при переходе табом поле выглядит одинаково: появляется чёрная рамка и, если поле не заполнено — маска, которые сохраняются до потери фокуса.
Валидация
Если пользователь ввел недостаточно цифр, при потере фокуса нужно показать валидацию.

Как сделать таково вида форму ввода телефона?
Достаточно ли использовать только bootstrap?

задан 4 апр 2017 в 11:30
![]()
Например можно дополнительно использовать плагин — masked-input-plugin
$(".phone").mask("+7(999)999-9999");<script src="https://code.jquery.com/jquery-2.2.4.js"></script>
<script src="https://cdnjs.cloudflare.com/ajax/libs/jquery.maskedinput/1.4.1/jquery.maskedinput.min.js"></script>
<input type="text" class="phone">ответ дан 4 апр 2017 в 11:38
![]()
HamSterHamSter
22.3k10 золотых знаков54 серебряных знака111 бронзовых знаков
Советую использовать Phone Input из bootstrap form helpers (нужен JQuery). Тогда html поля ввода будет выглядеть примерно так:
<input type="text" class="input-medium bfh-phone" data-format="+7 (ddd) ddd-dd-dd">
ответ дан 4 апр 2017 в 11:44
![]()
Сегодня я расскажу вам, как можно улучшить форму обратной связи с помощью маски ввода телефона. Рассмотрим, как это реализовать на различных проектах.
Первый вариант – мы подключим маску к контактной форме на чистом html.
Второй вариант – мы рассмотрим, как сделать маску телефона для Contact Form 7, и заодно, как правильно подключать скрипты в WordPress через файл functions.php.
Содержание
- Маска ввода телефона к форме на html + js
- Маска телефона в WordPress плагине Contact Form 7
- Файлы для скачивания
Сперва посмотрим о чем идет речь:
В это поле можно вводить только цифры, и строго то количество которое задано у вас в маске.
Итак начнем! В обоих случаях нужно скачать файлы плагина jQuery Masked Input по этой ссылке с официального репозитория. Также даю ссылку на документации по плагину на GitHub.
Маска ввода телефона к форме на html + js
1. Создаем простую форму
1 2 3 4 5 6 7 |
<form> <div id="form-inner"> <label for="name">Ваш Телефон</label> <input type="text" id="phon" placeholder="+375 (XX) XXX-XX-XX"> <input type="submit" class="button" value="отправить"> </div> </form> |
2. Проверяем подключение библиотеки JQuery
Обязательно проверьте подключение библиотеки jquery между тегами <head>. Для этого в браузере, на странице вашего сайта введите команду CTRL+U, откроется код страницы. Теперь, с помощью команды CTRL+F найдите подключен скрипт JQuery или нет. Можно искать по фразе “jquery.js” или “jquery.min.js”. Пример, как выглядит в коде, ниже на скриншоте.
Она может быть подключена как из папки со скриптами у вас на сайте, так и через CDN Google или через другой, например Microsoft, CDNJS, jsDelivr. Посмотреть способы подключения можно на официальном сайте JQuery на странице скачивания, или перейти по ссылке. Если библиотека у вас не подключена, то нужно обязательно подключить, иначе работать “маска” не будет.

Мне удобно подключать через CDN Google. Чтобы подключить библиотеку JQuery скопируйте код ниже и вставьте между тегами <head> вашего сайта.
1 |
<script src="https://ajax.googleapis.com/ajax/libs/jquery/3.3.1/jquery.min.js"></script> |
3. Подключаем скрипты плагина
После того как мы убедились, что библиотека JQuery подключена, распаковываем скаченный архив с плагином “jQuery Masked Input”. Внутри архива находим папку “dist” и забираем оттуда минимизированный файл “jquery.maskedinput.min.js”. Я обычно кладу этот файл в корень сайта в папку со всеми скриптами “js”, и подключаю его между тегами <head>:
1 |
<script src="https://мой-домен.com/js/jquery.maskedinput.min.js"></script> |
Далее нам нужно сделать вызов кода маски и привязать его к уникальному идентификатору. Мы можем сделать это прописав уникальный class или id к полю input. В нашем случае мы пропишем id phon. Далее просто перед формой нужно вставить вот этот код:
1 |
<script type="text/javascript">jQuery(function($){$("#phon").mask("+375 (99) 999-99-99");});</script> |
Или, чтобы не вставлять каждый раз код скрипта перед каждой формой, создаём отдельный файл js, например maskphone.js, туда вставляем код ниже и сохраняем в папку “js” в корне сайта.
1 |
jQuery(document).ready(function() {jQuery("#phon").mask("+375 (99) 999-99-99");}); |
Теперь этот файл тоже нужно подключить между тегами <head>, скопируйте код ниже и вставьте его сразу после кода подключения плагина jquery.maskedinput.min.js. Должно получиться так:
1 2 |
<script src="https://мой-домен.com/js/jquery.maskedinput.min.js"></script> <script src="https://мой-домен.com/js/maskphone.js"></script> |
4. Определяем в какой форме и в каком поле будет работать плагин.
Всё, что нам нужно сделать, чтобы идентифицировать поле, это указать class или id в нужном поле input. Пример на картинке. На практике используйте что-то одно.

В примере, который я вам привёл, я использовал id – уникальное имя элемента. В таком случае, если у вас несколько одинаковых форм на одной странице маска телефона работать не будет. Так как id на странице может повторяться только 1 раз. Поэтому, если у вас на странице вызывается много раз одна и та же форма нужно прописать в поле input уникальный class.
Пример:
1 |
<input type="text" class="phon" placeholder="+375 (XX) XXX-XX-XX"> |
А для активации скрипта в поле по class необходимо заменить код в maskphone.js на следующий:
1 |
jQuery(document).ready(function() {jQuery(".phon").mask("+375 (99) 999-99-99");}); |
С этим все, теперь рассмотрим как сделать тоже самое на одной из самых популярных CMS WordPress и дополнительного плагина к ней Contact Form 7.
Маска телефона в плагине WordPress Contact Form 7
1. Скачиваем архив с файлами плагина “jQuery Masked Input” по ссылке
Создаем папку “js” в папке вашей темы (путь: ваш-сайт/wp-content/themes/ваша-тема/). Внутри архива плагина “jQuery Masked Input” находим папку «dist» и копируем оттуда минимизированный файл «jquery.maskedinput.min.js». Этот файл вставляем в папку “js”, которую только что создали.
2. Создаем форму в Contact Form 7
Например простейшую форму, с одним полем, над которым будем работать. И прописываем “class:phone”. Именно по наличию этого класса наш скрипт будет понимать, что к этому полю нужно добавить маску.

Вот код формы, если кому-то нужно:
1 2 |
[text* your-phone class:phon placeholder "Ваш телефон"] [submit class:button primary "Отправить"] |
3. Создаем скрипт с маской
В директории мой-домен.com/wp-content/themes/ваша-тема/js/ создаем файл “maskphone.js” и вставляем код:
1 2 3 |
jQuery(document).ready(function() { jQuery(".phon").mask("+375 (99) 999-99-99"); }); |
В данном случае мы используем идентификацию поля по Class. В чем разница, читайте в первой части статьи.
4. Теперь подключим скрипты
Самый простой способ подключения скриптов. Открываем файл header.php или footer.php, которые расположены по адресу ваш-сайт/wp-content/themes/ваша-тема/ и вставляем код:
1 2 |
<script src="https://мой-домен.com/wp-content/themes/ваша-тема/js/jquery.maskedinput.min.js"></script> <script src="https://мой-домен.com/wp-content/themes/ваша-тема/js/maskphone.js"></script> |
Однако данный способ не совсем правильный с точки зрения работы с системой WordPress. К примеру, если вы решите обновить тему, то наш сторонний код может удалиться. Поэтому более правильно подключить скрипты через файл functions.php.
4.1 Подключаем скрипты через файл functions.php
Я всегда использую только такой способ подключения скриптов и файлов css. Это очень удобно. Из проекта в проект на WordPress у меня перетекает кусочек кода и папка с файлами, которые я сейчас приложу для скачивания. Итак, открываем файл functions.php и между тегами <php> вставляем код:
1 2 3 4 5 6 7 8 9 |
function wpb_add_scripts() { wp_register_script('jquery.maskedinput.min.js', get_stylesheet_directory_uri(). '/js/jquery.maskedinput.min.js', '', '', true); wp_enqueue_script('jquery.maskedinput.min.js'); wp_register_script('maskphone.js', get_stylesheet_directory_uri(). '/js/maskphone.js', '', '', true); wp_enqueue_script('maskphone.js'); } add_action('wp_enqueue_scripts', 'wpb_add_scripts'); |
Стоит отметить, что код выше подходит для дочерней темы. Если же вы не используете дочернюю тему, то лучше использовать вот этот код:
1 2 3 4 5 6 7 8 9 |
function wpb_add_scripts() { wp_register_script('jquery.maskedinput.min.js', get_template_directory_uri(). '/js/jquery.maskedinput.min.js', '', '', true); wp_enqueue_script('jquery.maskedinput.min.js'); wp_register_script('maskphone.js', get_template_directory_uri(). '/js/maskphone.js', '', '', true); wp_enqueue_script('maskphone.js'); } add_action('wp_enqueue_scripts', 'wpb_add_scripts'); |
Подведя итог хочу сказать, что с помощью данного метода можно делать и другие маски ввода но об этом уже в другой статье.